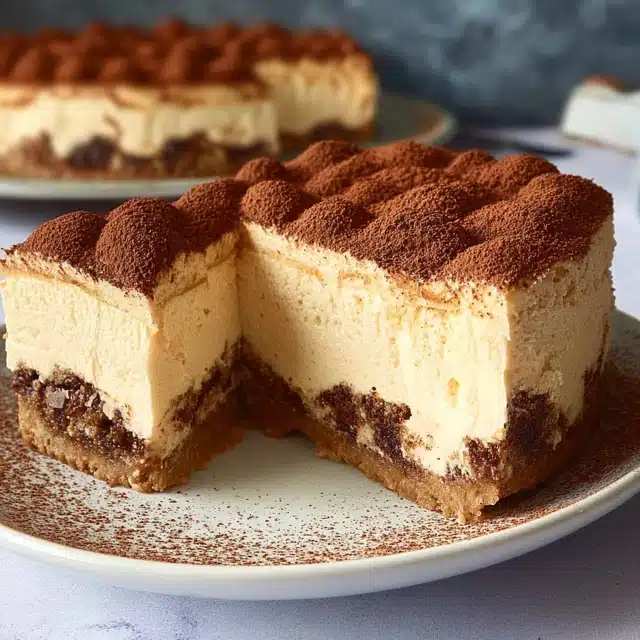
There’s something undeniably comforting about the layered elegance of tiramisu and the creamy indulgence of cheesecake. When the two are brought together in one dessert—tiramisu cheesecake—it becomes more than just a sweet treat. It becomes a celebration. A marriage of old-world Italian flavor and modern baking, this dessert has found a special place at birthdays, anniversaries, and every cozy winter gathering I can remember.

Growing up in a household where coffee always simmered on the stovetop and desserts were served with stories, tiramisu was a weekend staple. Meanwhile, cheesecake made its appearance at holidays, dense and dreamy with a hint of citrus. The first time I tasted tiramisu cheesecake was at a friend’s holiday dinner—and I was instantly enchanted. The mascarpone layer was silky, the coffee-soaked crust was bold, and the hint of cocoa made each bite feel like a warm embrace.
Now, every time the seasons shift and the air gets crisp, I find myself craving this dessert. It feels celebratory yet familiar, like a coffee break shared with someone you love. Whether you serve it during the holidays or as a weeknight treat to savor slowly, tiramisu cheesecake never fails to impress.
Why You’ll Love This Recipe:
- Combines two beloved desserts into one stunning centerpiece
- Perfectly balanced flavors: creamy, bold, and not overly sweet
- Make-ahead friendly, ideal for parties and gatherings
- Impresses both cheesecake lovers and tiramisu fans alike

Tiramisu Cheesecake
- Yield: 12 slices 1x
Description
There’s something undeniably comforting about the layered elegance of tiramisu and the creamy indulgence of cheesecake. When the two are brought together in one dessert—tiramisu cheesecake—it becomes more than just a sweet treat. It becomes a celebration. A marriage of old-world Italian flavor and modern baking, this dessert has found a special place at birthdays, anniversaries, and every cozy winter gathering I can remember.
Growing up in a household where coffee always simmered on the stovetop and desserts were served with stories, tiramisu was a weekend staple. Meanwhile, cheesecake made its appearance at holidays, dense and dreamy with a hint of citrus. The first time I tasted tiramisu cheesecake was at a friend’s holiday dinner—and I was instantly enchanted. The mascarpone layer was silky, the coffee-soaked crust was bold, and the hint of cocoa made each bite feel like a warm embrace.
Now, every time the seasons shift and the air gets crisp, I find myself craving this dessert. It feels celebratory yet familiar, like a coffee break shared with someone you love. Whether you serve it during the holidays or as a weeknight treat to savor slowly, tiramisu cheesecake never fails to impress.
Ingredients
- For the crust:
- 1 ½ cups crushed ladyfinger cookies (or graham crackers)
- ¼ cup granulated sugar
- 6 tablespoons unsalted butter, melted
- 2 tablespoons brewed espresso or strong coffee
- For the cheesecake filling:
- 3 (8 oz) packages cream cheese, softened
- 1 cup granulated sugar
- 1 teaspoon vanilla extract
- 3 large eggs
- ¾ cup sour cream
- 8 oz mascarpone cheese, softened
- 2 tablespoons all-purpose flour
- 2 tablespoons brewed espresso or strong coffee
- For the topping:
- ½ cup heavy cream
- 2 tablespoons powdered sugar
- 4 oz mascarpone cheese
- Unsweetened cocoa powder, for dusting
- Optional: chocolate shavings or coffee beans for garnish
Instructions
- 1. Prepare the crust
Start by preheating your oven to 325°F (163°C). Mix the crushed ladyfinger cookies (or graham crackers) with sugar, melted butter, and espresso. Press the mixture into the bottom of a 9-inch springform pan. Use the bottom of a measuring cup to smooth it down evenly. Bake for 10 minutes, then set aside to cool slightly. - 2. Make the filling
In a large bowl, beat the softened cream cheese and sugar until light and fluffy. This is key for a smooth texture. Add the vanilla, then beat in the eggs one at a time. Blend in the sour cream and mascarpone cheese, followed by the flour and espresso. Don’t overmix—just blend until everything is smooth and combined. - 3. Assemble and bake
Pour the cheesecake filling over the cooled crust. Smooth out the top with a spatula. Place the pan in a water bath (wrap the bottom in foil to avoid leaks) and bake for 55–65 minutes, or until the center is just set but still slightly jiggly. Let the cake cool in the oven with the door slightly ajar for an hour to avoid cracking, then chill in the fridge for at least 6 hours or overnight. - 4. Whip up the topping
Once chilled, beat the heavy cream and powdered sugar until soft peaks form. Add mascarpone and continue whipping until firm peaks form. Spread this cloud-like topping over your cheesecake and dust with cocoa powder right before serving.
Notes
- This recipe can be made a day ahead
- Use gluten-free ladyfingers for a gluten-free option
- Adjust espresso quantity for a stronger or milder coffee flavor
Nutrition
- Calories: 450
INGREDIENTS YOU’LL NEED:
For the crust:
- 1 ½ cups crushed ladyfinger cookies (or graham crackers)
- ¼ cup granulated sugar
- 6 tablespoons unsalted butter, melted
- 2 tablespoons brewed espresso or strong coffee

For the cheesecake filling:
- 3 (8 oz) packages cream cheese, softened
- 1 cup granulated sugar
- 1 teaspoon vanilla extract
- 3 large eggs
- ¾ cup sour cream
- 8 oz mascarpone cheese, softened
- 2 tablespoons all-purpose flour
- 2 tablespoons brewed espresso or strong coffee
For the topping:
- ½ cup heavy cream
- 2 tablespoons powdered sugar
- 4 oz mascarpone cheese
- Unsweetened cocoa powder, for dusting
- Optional: chocolate shavings or coffee beans for garnish
HOW TO MAKE Tiramisu Cheesecake:
Step-by-Step Instructions:
1. Prepare the crust
Start by preheating your oven to 325°F (163°C). Mix the crushed ladyfinger cookies (or graham crackers) with sugar, melted butter, and espresso. Press the mixture into the bottom of a 9-inch springform pan. Use the bottom of a measuring cup to smooth it down evenly. Bake for 10 minutes, then set aside to cool slightly.
2. Make the filling
In a large bowl, beat the softened cream cheese and sugar until light and fluffy. This is key for a smooth texture. Add the vanilla, then beat in the eggs one at a time. Blend in the sour cream and mascarpone cheese, followed by the flour and espresso. Don’t overmix—just blend until everything is smooth and combined.

3. Assemble and bake
Pour the cheesecake filling over the cooled crust. Smooth out the top with a spatula. Place the pan in a water bath (wrap the bottom in foil to avoid leaks) and bake for 55–65 minutes, or until the center is just set but still slightly jiggly. Let the cake cool in the oven with the door slightly ajar for an hour to avoid cracking, then chill in the fridge for at least 6 hours or overnight.
4. Whip up the topping
Once chilled, beat the heavy cream and powdered sugar until soft peaks form. Add mascarpone and continue whipping until firm peaks form. Spread this cloud-like topping over your cheesecake and dust with cocoa powder right before serving.
Helpful Tips:
- Use room temperature ingredients for a silky filling
- Don’t skip the water bath—it prevents cracks
- Chill overnight for best flavor and texture
- Dust with cocoa just before serving to avoid absorption
- For stronger flavor, brush extra espresso on the crust before adding the filling

DETAILS:
Prep Time: 25 minutes
Cook Time: 60 minutes
Total Time: 7 hours (including chilling time)
Yield: 12 slices
Category: Dessert
Method: Baking
Cuisine: Italian-American
Diet: Vegetarian
Notes:
- This recipe can be made a day ahead
- Use gluten-free ladyfingers for a gluten-free option
- Adjust espresso quantity for a stronger or milder coffee flavor

Nutritional Information:
Estimates per slice
Calories: 450
Fat: 32g
Carbohydrates: 32g
Protein: 6g
Sugar: 22g
Frequently Asked Questions:
Can I use store-bought crust?
Yes, but for that authentic tiramisu flavor, ladyfinger crust adds a delightful coffee-infused base.
What can I substitute for mascarpone?
You can use full-fat cream cheese as a substitute, but mascarpone gives a more authentic tiramisu taste.
Do I need a water bath?
It’s highly recommended. It helps the cheesecake bake evenly and prevents cracking.
Can I freeze tiramisu cheesecake?
Absolutely! Wrap slices tightly and freeze for up to 2 months. Thaw overnight in the fridge.
Storage Instructions:
Store leftover tiramisu cheesecake in the refrigerator in an airtight container for up to 5 days. For longer storage, freeze individual slices wrapped tightly in plastic wrap and foil, then thaw in the fridge before serving.

Related Recipes:
If you liked this tiramisu cheesecake, you’ll definitely enjoy these other creamy favorites:
- Zesty Citrus-Infused Lemon Brownies
- Monster Cookie Fudgy Brownies
- Coffee Brownies: A Heavenly Blend of Coffee and Chocolate
- The Best Peanut Butter Brownies
Conclusion:
Whether you’re serving it for a dinner party or enjoying a quiet night in with a cup of coffee, tiramisu cheesecake offers the best of both worlds. It’s decadent, aromatic, and just the right balance of coffee, cream, and cocoa. With every bite, you’ll feel like you’re sitting in a cozy Italian café—right at your own table. Don’t wait for a special occasion; make it yours today.