Growing up, summer treats were all about staying cool without turning on the oven. My mother used to make cold custards and layered icebox cakes, and I remember the thrill of pulling out chilled desserts on sweltering afternoons. These No-Bake Chia Pudding Bars are a modern homage to that memory—fresh, nutrient-rich, and made without a single minute of baking.

Chia seeds, long revered by ancient cultures like the Aztecs and Mayans, are now a favorite for health enthusiasts around the world. But beyond the buzzwords, what really draws me to this recipe is its texture—the contrast between the soft, creamy chia pudding and the crunchy, nutty base is deeply satisfying. Layer in seasonal fruits, and you have a versatile, cooling treat that works just as well for breakfast as it does for dessert.
Whether you’re meal-prepping for the week, making snacks for kids, or just trying to sneak more fiber and omega-3s into your diet, these bars feel like a little slice of summer simplicity, no matter the season.

Why You’ll Love This Recipe:
- No oven required—perfect for hot weather or quick prep
- Loaded with nutrients like fiber, protein, and omega-3s
- Customizable—swap in your favorite fruits, nuts, or non-dairy milk
- Make-ahead friendly—store in the fridge for up to a week
- Deliciously creamy with a satisfying crunch

No-Bake Chia Pudding Bars
- Yield: 9 bars 1x
Description
Growing up, summer treats were all about staying cool without turning on the oven. My mother used to make cold custards and layered icebox cakes, and I remember the thrill of pulling out chilled desserts on sweltering afternoons. These No-Bake Chia Pudding Bars are a modern homage to that memory—fresh, nutrient-rich, and made without a single minute of baking.
Chia seeds, long revered by ancient cultures like the Aztecs and Mayans, are now a favorite for health enthusiasts around the world. But beyond the buzzwords, what really draws me to this recipe is its texture—the contrast between the soft, creamy chia pudding and the crunchy, nutty base is deeply satisfying. Layer in seasonal fruits, and you have a versatile, cooling treat that works just as well for breakfast as it does for dessert.
Whether you’re meal-prepping for the week, making snacks for kids, or just trying to sneak more fiber and omega-3s into your diet, these bars feel like a little slice of summer simplicity, no matter the season.
Ingredients
- For the crust:
- 1 cup rolled oats
- ½ cup almonds or cashews
- 8 Medjool dates, pitted
- 2 tablespoons coconut oil (melted)
- Pinch of salt
- For the chia pudding layer:
- 1 ½ cups unsweetened almond milk (or other plant-based milk)
- ⅓ cup chia seeds
- 2 tablespoons maple syrup
- ½ teaspoon vanilla extract
- Toppings (optional but recommended):
- Fresh berries (blueberries, strawberries, raspberries)
- Sliced banana or kiwi
- Shredded coconut
- Crushed nuts or seeds
Instructions
- 1. Make the chia pudding
In a mixing bowl, whisk together almond milk, chia seeds, maple syrup, and vanilla extract. Let the mixture sit for 10 minutes, then whisk again to prevent clumping. Cover and refrigerate for at least 2 hours, or until it thickens to a pudding-like consistency. I like to make this the night before so it’s ready to go the next day. - 2. Prepare the crust
In a food processor, blend the rolled oats, nuts, and salt until you get a coarse flour. Add in the pitted dates and coconut oil, then pulse until the mixture is sticky and crumbly. Press this mixture firmly into the bottom of a parchment-lined 8×8-inch pan. Use the bottom of a glass or your fingers to smooth it out evenly. - 3. Add the chia layer
Once your chia pudding is set, spread it over the crust in an even layer. Smooth the top with a spatula, making sure it reaches all the edges. - 4. Chill and decorate
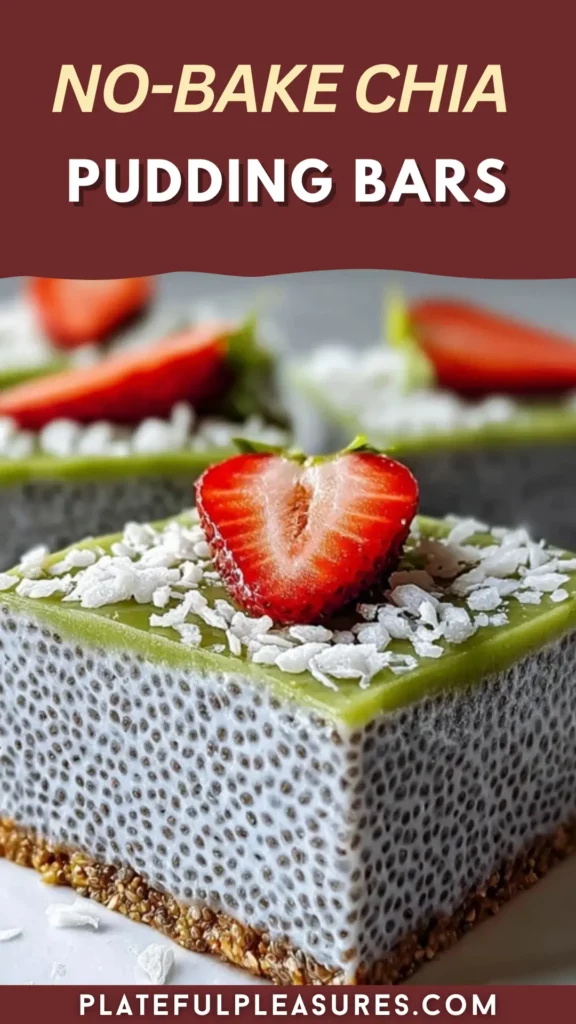
Place the pan in the fridge for at least 4 hours (or overnight) so the bars can fully set. When you’re ready to serve, top with fresh fruit, coconut flakes, or a drizzle of nut butter. - 5. Slice and enjoy
Cut into bars or squares and serve chilled. They’re creamy, fruity, and just the right amount of sweet—ideal for breakfast on-the-go or an afternoon energy boost.
Notes
- You can use any non-dairy milk you prefer, but almond, oat, or coconut milk all give great flavor and texture. Play with toppings depending on the season—autumn pears, summer berries, or even citrus zest in winter work beautifully.
Nutrition
- Calories: 180
INGREDIENTS YOU’LL NEED:
For the crust:
- 1 cup rolled oats
- ½ cup almonds or cashews
- 8 Medjool dates, pitted
- 2 tablespoons coconut oil (melted)
- Pinch of salt
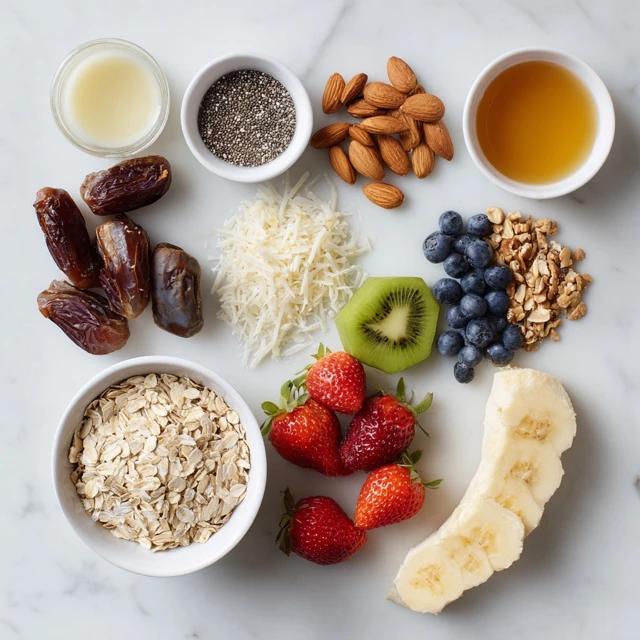
For the chia pudding layer:
- 1 ½ cups unsweetened almond milk (or other plant-based milk)
- ⅓ cup chia seeds
- 2 tablespoons maple syrup
- ½ teaspoon vanilla extract
Toppings (optional but recommended):
- Fresh berries (blueberries, strawberries, raspberries)
- Sliced banana or kiwi
- Shredded coconut
- Crushed nuts or seeds
How to Make No-Bake Chia Pudding Bars
These No-Bake Chia Pudding Bars come together with minimal effort and maximum reward. Let’s walk through it step by step.
STEP-BY-STEP INSTRUCTIONS:
1. Make the chia pudding
In a mixing bowl, whisk together almond milk, chia seeds, maple syrup, and vanilla extract. Let the mixture sit for 10 minutes, then whisk again to prevent clumping. Cover and refrigerate for at least 2 hours, or until it thickens to a pudding-like consistency. I like to make this the night before so it’s ready to go the next day.
2. Prepare the crust
In a food processor, blend the rolled oats, nuts, and salt until you get a coarse flour. Add in the pitted dates and coconut oil, then pulse until the mixture is sticky and crumbly. Press this mixture firmly into the bottom of a parchment-lined 8×8-inch pan. Use the bottom of a glass or your fingers to smooth it out evenly.
3. Add the chia layer
Once your chia pudding is set, spread it over the crust in an even layer. Smooth the top with a spatula, making sure it reaches all the edges.

4. Chill and decorate
Place the pan in the fridge for at least 4 hours (or overnight) so the bars can fully set. When you’re ready to serve, top with fresh fruit, coconut flakes, or a drizzle of nut butter.
5. Slice and enjoy
Cut into bars or squares and serve chilled. They’re creamy, fruity, and just the right amount of sweet—ideal for breakfast on-the-go or an afternoon energy boost.
HELPFUL TIPS:
- Make ahead: These bars store well in the fridge for up to 5 days. Keep them in an airtight container for best texture.
- Crust flexibility: No dates? Use a couple tablespoons of maple syrup or a splash of almond butter instead.
- Get creative: Stir in cocoa powder, matcha, or cinnamon into the chia pudding for extra flavor.
- Texture tip: If you prefer a smoother texture, blend the chia pudding after it sets before layering.
- Cut clean slices: Chill thoroughly before slicing, and wipe the knife clean between cuts.

DETAILS:
- Prep Time: 20 minutes (plus chilling time)
- Cook Time: 0 minutes
- Total Time: 20 minutes + 4 hours chilling
- Yield: 9 bars
- Category: Snack, Dessert, Breakfast
- Method: No-Bake
- Cuisine: American, Healthy
- Diet: Vegan, Gluten-Free, Dairy-Free
NOTES:
You can use any non-dairy milk you prefer, but almond, oat, or coconut milk all give great flavor and texture. Play with toppings depending on the season—autumn pears, summer berries, or even citrus zest in winter work beautifully.
NUTRITIONAL INFORMATION: (Per serving, approx.)
- Calories: 180
- Protein: 4g
- Fat: 9g
- Carbohydrates: 22g
- Fiber: 6g
- Sugar: 9g
FREQUENTLY ASKED QUESTIONS:
Can I freeze these bars?
Yes, you can freeze them for up to 1 month. Wrap them individually for a quick grab-and-go snack. Let thaw in the fridge before eating.
Do I have to use almond milk?
Nope! Any plant-based milk works—oat, soy, coconut, or cashew milk are all great options.
What if I don’t have a food processor?
You can use a high-speed blender or even mix the crust ingredients by hand if your dates are soft enough.
Can I make this nut-free?
Absolutely—just replace the almonds or cashews with sunflower seeds or pumpkin seeds.
STORAGE INSTRUCTIONS:
Store in an airtight container in the refrigerator for up to 5 days. For longer storage, freeze and thaw individual portions overnight in the fridge.

Related Recipes:
If you liked these No-Bake Chia Pudding Bars, you’ll definitely enjoy these other healthy bites:
- Creamy Andes Mint Chocolate Truffles
- Oreo Chocolate Chip Cookies
- Mexican Chocolate Milk Cake
- Chocolate Orange Layer Cake with Ganache
CONCLUSION:
These No-Bake Chia Pudding Bars are the kind of recipe that makes you feel good from the inside out—fresh, wholesome, and quietly nourishing. Whether you’re preparing for a busy week or sharing with friends at a brunch, these bars deliver both on flavor and feel-good ingredients. They’re a beautiful reminder that simple, nutritious food doesn’t have to be complicated—or heated.